


Tonight’s the night for the annual Chittenango School Fair at Chittenango High School (150 Genesee Street, Chittenango, NY 13037). It takes place from 5:30 – 8:00 pm. This is my display – set up in the hallway between the two gyms.


Tonight’s the night for the annual Chittenango School Fair at Chittenango High School (150 Genesee Street, Chittenango, NY 13037). It takes place from 5:30 – 8:00 pm. This is my display – set up in the hallway between the two gyms.


I thought it would be fun to create trompe l’oeil donuts. We made them from an armature of aluminum foil, paper towels and masking tape.


Students then applied Mod Podge with a brush to paper towel bits, adhering them to the armature. They really looked like glazed donuts – so cool!


Cell-u-clay was next. It is a paper pulp that is applied wet in a sort of oatmeal consistency. This was the frosting.


Each student (in two of my 8th grade art classes) created a dozen donuts. Because I didn’t think six was enough, lol. They painted the Cell-u-clay with acrylics and added decorative details.


Some students glued their finished pieces to foamboard and others placed them in boxes provided by the local Dunkin’ Donuts. The projects are currently on display in the library at Chittenango Middle School, Chittenango, New York.

I just loved this project. I think everyone loved it! Students in the 9th period B day class even came in during their study hall to become “donut fairies” – they helped the A day group! Everyone helped each other and it was truly magical. So fun! <3


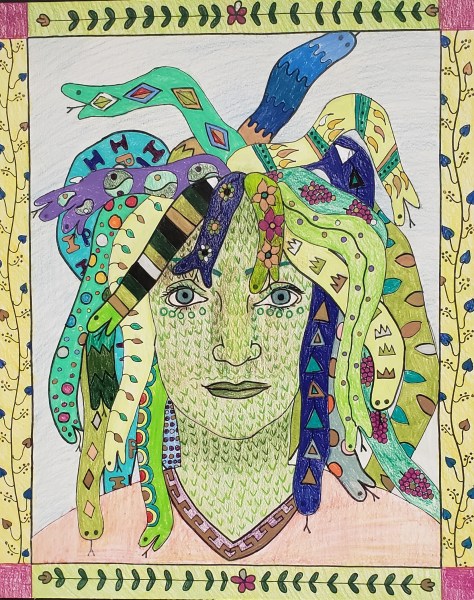
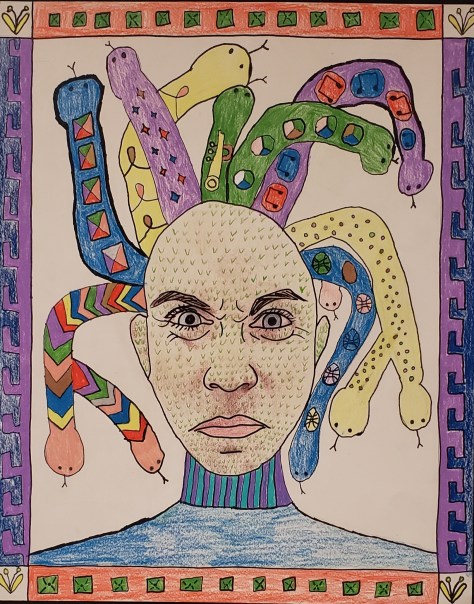
I decided to infuse the 8th grade Medusa drawing project with real people. I was driving to work a few weeks ago and the idea just came to me, lol, but would the teachers at Chittenango Middle School go for it?


On the half day, I sent out an email then I ran around taking pictures of those who were receptive to being immortalized as Medusa. The principals were even on board, which was so, totally, awesome!


Students selected from the faces and added the snake hair and Greek pattern border. We watched excerpts from 1981 and 2012 Clash of the Titans while using Sharpies and colored pencils. Here are the results. They used 16″ x 20″ white heavyweight tagboard and Prismacolor colored pencils.


I have two classes working on a new batch on brown Kraft paper. It is such a fun project. So many possibilities with regard to color schemes and composition. So incredibly satisfying!

This artwork is currently on display in the hallway outside of my classroom at Chittenango Middle School in Chittenango, New York. It will be up for a while, at least until the end of the semester at the end of January. I will display some of them at the school fair in May too.



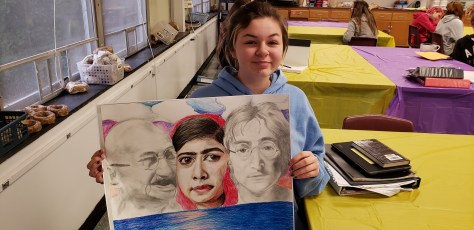
Kindness Matters was the subject of this year’s Lions Club sponsored Peace Poster contest. My Studio in Art class students spent about six weeks working on their illustrations.

Emily’s poster won the local and regional competition. It is on its way to the state competition next and if she wins at the international level – well, that would be a huge win for all of us: $5,000 for her and twelve years of poster-making and working closely with the beautiful people/lions who make up the committee that will culminate in an enormous sense of pride and victory for our small community in Chittenango, New York.


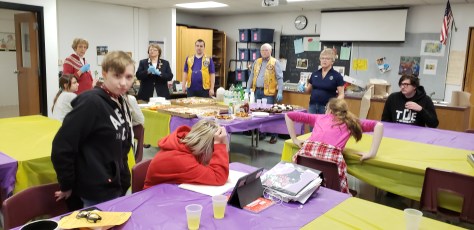


The Chittenango Lions threw us a classroom pizza party and awarded monetary gifts and plaques for 1st, 2nd and 3rd place picks. The rest of the students were all unanimously honored with honorable mentions. Their work was spectacular.


These peace posters will be on display during December 2018 in the Community Room at the Sullivan Library, 101 Falls Blvd., Chittenango, New York 13037. Visit their website for hours of operation.


You may have noticed the development of pig sculptures – I’ve had them on the counter as background in my #ootd pictures. The project had a couple of components. Students created armature with paper towels, masking tape, aluminum foil and a recycled bottle of juice or iced coffee (I have tons!). The sculptures were engulfed in Pariscraft then painted. Once they were done, the artists took their pigs to a secret location somewhere in the school and using their I-Pads, photographed them in a composition. It was a really fun project.


My Facebook friends inquired if the sculptures would be auctioned off. I mentioned that to the students and a few got the professional artist bug, lol. So, some of the pigs are for sale. Proceeds will teach students a valuable lesson about their time and effort. All pigs are priced at $50 each.

These eight pigs are available. Artwork can be collected at Chittenango Middle School. Email me at ktashkovski@chittenangoschools.org to make arrangements to purchase. All proceeds will go to the budding artists.


This lesson is inspired by Grant Wood’s American Gothic.


Students had to conceive an idea for the composition. I had planned to have them draw thumbnail sketches, as well as lists of what props they would need – but after showing my accelerated Studio in Art kids the ones done by my students in 2012 and 2013 via my school web-site, they just knew what they were going to do. It was the craziest thing and really phenomenal the way they all collaborated with one another.

Each student planned the day for their picture – we had two weeks before Christmas break and it was a tight schedule for the twelve of them. They all brought their costumes, props and their A games with them, lol!


I just loved how they were able to count on each other and how responsible everyone was for their respective part in both their own work and that of their friend(s). Models allowed the artist to direct them. The poses replicated the ones in Wood’s painting with the person on the right looking straight into the camera and the other one gazing in the distance. I placed the school’s green screen against a wall for the photo shoots, printed the pictures then cut and pasted them to foamboard.

They created the backgrounds using a variety of mixed-media including tissue and decorative papers, toothpicks, beads, glitter and more. The border was done in metallic paint to act as a frame. A picture from the internet chosen to convey a theme was selected as reference and they attacked the canvas panels with vigor. It was so exciting to see them work. There was so much confidence amidst the chaos of all the materials.


Once the background was finished and dry (everything attached with Mod-Podge and/or hot glue), we placed 3-D Os on the back of the foamboard and poppped the pics on top. The result – twelve very different, very cool mixed-media pieces that are currently on display in a glass case in the atrium of Chittenango Middle School in Chittenango, New York.


This was a fun lesson – another one of my inventions: Greek urns. They are made of Pariscraft, not clay. We used the plastic water bowls as molds, so it was a stagger start since I don’t have very many of them.


Students placed 4 layers of plaster of Paris on the bowl. In the following class, they were in a déja vu re-run because we needed two bowl molds for the armature. Next, they added plastic cups (from Subway, Wendy’s, and various cottage cheese varieties). I cut the hole at the bottom of the top cup and at the top of one of the plaster bowls. They added plaster to the separate pieces then taped the bowls together with masking tape and went back to the plaster station to complete the step. (Aluminum foil for the handles.)


This was followed by painting the urn one solid color and then applying Greek patterns – and more color.


They are stunning. I love them! Really substantial two and three feet sculptures. I want them to write a note to their future selves and store it inside the vessels. I am always thinking about my thirteen-year-old self. Is she proud of who I have become? (I know she is!) The note would serve as an artifact, the way Ancient Greek urns found in an archeological dig teach us about the culture that once was. So fun!


Penny Santy’s bull paintings are currently hanging on the walls of the Chittenango Middle School library. She will be visiting us on Tuesday, November 15, 2016 for an artist talk during 10th period! In honor of her visit, four of my Art-8 classes created cows and bulls in both acrylic paint and oil pastels.


I have them hanging on the walls of the hallway outside of my art classroom.


The oil pastels are done on black Strathmore paper. Students created the drawings on white paper, transferred them onto the black using graphite paper (which introduces a bit of magic, and you all know I love magic!). Then they painted out the lines in black acrylic and went to town with the pastels – creating rhythm and texture via their own individual styles.


The acrylic paintings went through the same initial process – drawn on white paper, transferred with magic . Students were also encouraged to create their own styles, although I did have a handout to give what I call Ms. Tash Pearls of Wisdom. These are pointers to mixing colors so that one color ends up permeating throughout the canvas. Raw Sienna is that color.


Black outlining was an option. Penny Santy utilizes complimentary color schemes. Most of the pieces she is exhibiting have an orange/blue color scheme. I was pleased to see so many colorful animals, purple cows and red bulls, lol, as well as the rest of the rainbow.


I wonder which ones I should enter into the Scholastic Art Awards competition? I like them all! Thank you, Penny Santy, for being such a marvelous inspiration to my kids!


My 8th grade accelerated Studio in Art students created these clay fish sculptures. We used Sax under-glazes with Amaco gloss glaze on top.


I think this is one of my favorite lessons of all time. I just loved how much care the students took to build their sculptures and then to glaze them. We had twelve colors. They had to use at least six (two to three coats each).


Roll the clay out with a rolling pin (each piece was approximately 3″ x 6″). Then place crumpled up paper towel in the center. Close up one side. It will look like a waffle cone. Add clay to the top to smooth out the head then add fins, a tail, eyes, gills and other details. This is done using slip (clay and water) as the glue/mortar that seals clay to clay.


They took about four classes to create and four classes to glaze. I let the sculptures dry for two weeks before the bisque fire.


Love them!


My Studio in Art students just finished these mugs. So – it was a glazing project. They were ready-made bisque-fired cappuccino mugs. Students used Mayco and Amaco glazes to create an animal of the Chinese Zodiac in honor of Chinese New Year.


Nobody picked the monkey though!


I took these images to post here. Their response?


“Oh, you and that blog!” with an eye roll, lol.


